
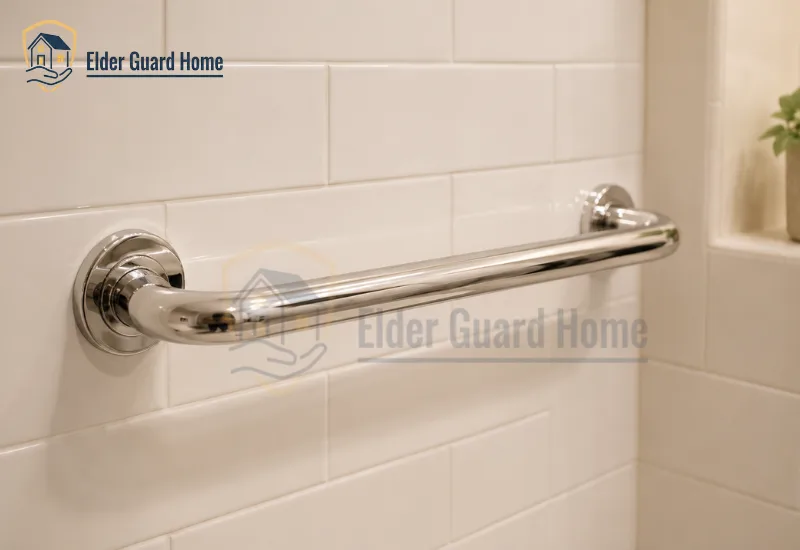
What Makes Grab Bars ADA Compliant?
ADA grab-bar requirements cover dimensions, wall clearance, positioning, surface safety, fittings, installation, and structural strength. Circular grab bars generally must measure 1¼ to 2 inches in outside diameter under the 2010 ADA Standards.
The applicable requirements for length and placement depend on the fixture and its configuration. Toilet, shower, and bathtub provisions are not interchangeable.
A product label alone does not establish that the entire installation meets the applicable requirements. The bar, mounting system, supporting structure, and installed position must all be suitable for the intended use.
For a broader safety plan, read our ultimate bathroom fall prevention guide for seniors, which covers grab bars and other common bathroom hazards.
What Makes a Grab Bar ADA Compliant?
The ADA Standards for Accessible Design specify grab-bar requirements for certain accessible toilet and bathing facilities. The relevant provisions appear in Sections 604, 607, 608, and 609 of the 2010 Standards.
Section 609 covers general grab-bar characteristics. Other sections explain where bars must be provided and how they must be positioned for specific fixtures.
A grab bar must meet the applicable requirements for its location. Correct diameter alone does not establish compliance. Neither does a manufacturer’s advertised weight capacity.
The installation also matters. A suitable bar attached to an unsuitable wall may not provide dependable support.
Before purchasing, consider these four questions:
- Does the bar have the correct dimensions for its intended use?
- Does the proposed location meet the applicable placement requirements?
- Can the wall and mounting system support the required structural loads?
- Do the product instructions support the proposed installation method?
For regulated facilities, the applicable accessibility requirements must be assessed as a whole. For private homes, use the standards as a reference while considering the household’s needs, local requirements, and installation conditions.
You can review the official 2010 ADA Standards for Accessible Design for the original provisions.
When comparing permanent grab bars for a shower, our guide to shower handrails for the elderly explains how bar length, mounting surface, and installation method affect your choice.
ADA Grab Bar Requirements at a Glance
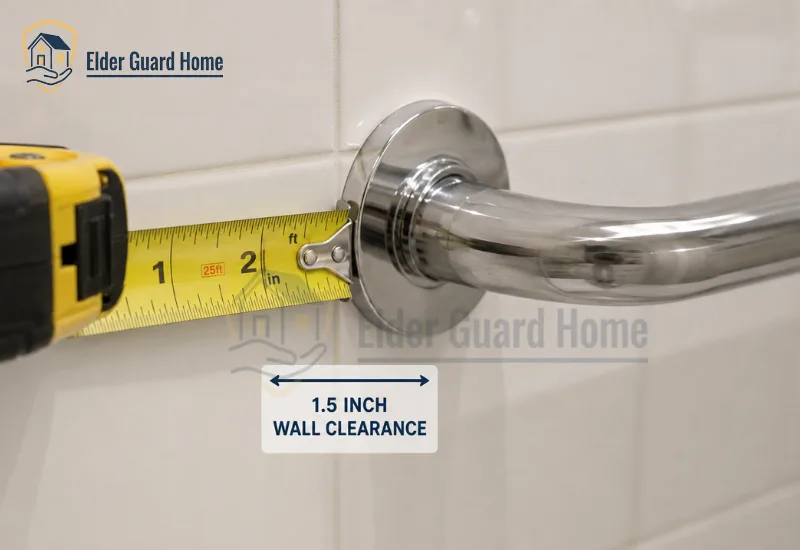
The following table summarizes important general requirements under Section 609. Fixture-specific provisions may add requirements for length, position, and configuration.
| Requirement | General ADA provision | What to check |
|---|---|---|
| Circular bar diameter | 1¼ to 2 inches outside diameter | Confirm the actual outside diameter. |
| Non-circular bar dimensions | Maximum cross-section dimension of 2 inches; perimeter of 4 to 4.8 inches | Check the manufacturer’s cross-section specifications. |
| Wall clearance | 1½ inches minimum | Measure the space between the wall and gripping surface. |
| Nearby projecting objects | Generally 1½ inches minimum below and at the ends; 12 inches minimum above | Check shelves, fittings, and other projections, including applicable exceptions. |
| Surface safety | No sharp or abrasive elements; rounded edges | Inspect the gripping surface and nearby wall surfaces. |
| Fittings | The bar must not rotate within its fittings | Confirm that the fittings are secure. |
| Installation | Must provide the required gripping surface and preserve required clear floor space | Check the installed position and surrounding space. |
| Structural strength | Must satisfy the force provision in Section 609.8 | Verify the product, fasteners, mounting devices, and supporting structure. |
These requirements should be read alongside the full standard. The ADA includes exceptions and fixture-specific provisions that may affect a particular installation.
Important: Section 609.8 addresses a 250-pound force applied at any point on the grab bar, fasteners, mounting devices, or supporting structure. This is a structural-strength requirement, not a consumer weight rating or a recommendation to conduct a DIY load test.
ADA Compliant Grab Bar Diameter, Wall Clearance, and Surface Requirements
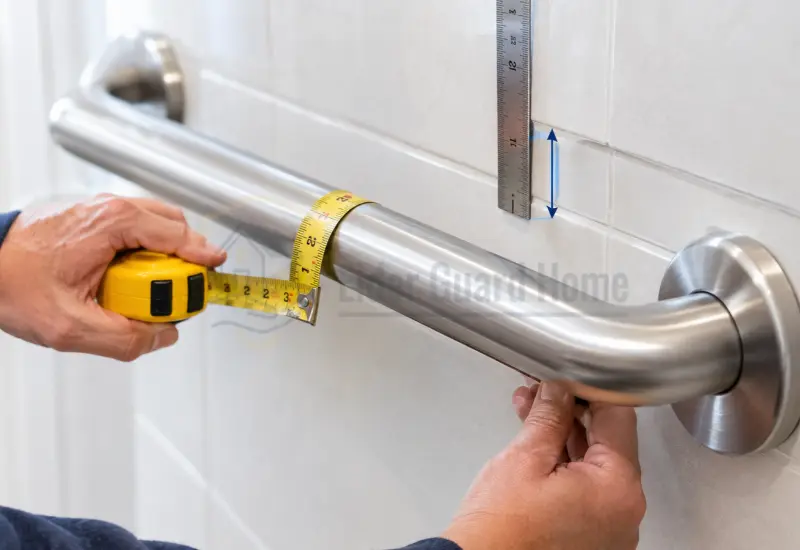
These general specifications help determine whether a bar is suitable for an applicable installation. Each requirement addresses a different aspect of safe use.
Required Grab Bar Diameter
Section 609.2.1 permits circular grab bars with an outside diameter from 1¼ to 2 inches. Section 609.2.2 provides separate dimensions for non-circular cross-sections.
This means the older claim that every ADA-compliant circular bar must measure only 1¼ to 1½ inches is too restrictive.
When comparing products, check the manufacturer’s actual dimensions. Do not rely only on the product title or a marketing badge.
The grip should also be comfortable for the person using it. Someone with limited hand strength may have different practical needs from another user, even when both products meet the applicable dimensional requirements.
Wall Clearance and Nearby Obstructions
Section 609.3 generally requires at least 1½ inches between the wall and the grab bar. It also specifies clearances from projecting objects below, at the ends, and above the bar.
Nearby shelves, soap holders, shower fittings, and decorative accessories can affect usable gripping space. Some fittings have specific exceptions, so the applicable provision must be checked rather than assuming every situation uses identical measurements.
Measure the clearance after installation, not just before purchasing. The mounting hardware and surrounding wall features can affect the final arrangement.
Surface Safety and Secure Fittings
Section 609.5 requires grab bars and adjacent surfaces to be free from sharp or abrasive elements and to have rounded edges. Section 609.6 says grab bars must not rotate within their fittings.
A textured finish may be useful for some users, particularly in wet areas. However, the general ADA provision does not require every grab bar to have a knurled or specially textured surface.
Look for a comfortable gripping surface without sharp edges or damage. Also check that the installed bar remains secure during ordinary inspection.
Structural Strength and Wall Support
Section 609.8 specifies the structural-strength requirement for the bar, fasteners, mounting devices, and supporting structure.
This requirement cannot be verified by looking at the bar alone. Wall construction and the mounting method affect the completed installation.
A product’s advertised weight capacity is not proof that the entire installation meets the ADA requirements. Follow the manufacturer’s instructions and ensure the mounting system is suitable for the actual wall assembly.
Never attempt to verify compliance by applying a 250-pound load yourself. If the installation or supporting structure is uncertain, consult a qualified installer.
ADA Compliant Bathroom Grab Bars — General Placement Principles
ADA compliant bathroom grab bars must be positioned according to the applicable fixture requirements. There is no single layout that works for every toilet, bathtub, or shower.
Section 609.4 generally places horizontal grab bars between 33 and 36 inches above the finished floor, measured to the top of the gripping surface. This is a general provision, not a universal height rule for every bar in every bathroom.
For example, bathtub back-wall bars have additional requirements. Children’s facilities and certain specialized applications also have different provisions.
Before selecting a bar, identify the fixture and the applicable section. Then confirm the required length, location, height, clearance, and mounting arrangement.
For a home safety project, also consider the person’s height, reach, balance, and movement patterns. A bar that meets a general measurement may still be poorly positioned for a particular person when the project is not governed by the same accessibility requirements.
ADA Compliant Toilet Grab Bars — Requirements and Placement
Toilet grab bars support movement when someone sits down, stands up, or transfers between a wheelchair and the toilet. The required arrangement depends on the applicable toilet configuration.
Section 604.5 covers grab bars at water closets. It generally specifies a bar on the side wall closest to the toilet and another on the rear wall, subject to the standard’s exceptions.
Side-Wall Grab Bar Requirements
Under Section 604.5.1, the side-wall grab bar must be at least 42 inches long. It must be located no more than 12 inches from the rear wall and extend at least 54 inches from that wall.
These dimensions describe the required positioning in the specified accessible toilet arrangement. They should not be treated as a universal product-length recommendation for every residential bathroom.
When comparing bars, check the usable gripping length and the intended mounting layout. Also consider nearby dispensers, flush controls, and other fittings that may affect the required arrangement.
Rear-Wall Grab Bar Requirements
Section 604.5.2 generally requires a rear-wall grab bar at least 36 inches long. It must extend at least 12 inches on one side of the toilet centerline and at least 24 inches on the other.
The standard includes exceptions for certain recessed fixtures and conflicting flush-control locations. Those exceptions should not be generalized to every toilet installation.
Measure the toilet’s location and the available wall space before selecting a bar. Do not assume that a centered bar of any length will satisfy the applicable requirements.
How to Choose ADA Compliant Grab Bars for Toilet Areas
Start by identifying the toilet arrangement and the applicable accessibility requirements. Then confirm the required side-wall and rear-wall positions.
Check the diameter, clearance, mounting method, and usable gripping surface. The bar must also be appropriate for the wall construction and intended use.
A product marketed as a toilet safety rail may have a different design from a wall-mounted grab bar. Compare the actual product specifications and installation requirements instead of relying on the name alone.
Some older adults also need extra help sitting down and standing up. Our guide to the best raised toilet seats for elderly adults compares options with different heights and support arms.
ADA Compliant Shower Grab Bars — Requirements by Shower Type
Shower compartments have different requirements depending on their configuration. Section 608.3 identifies the applicable grab-bar arrangements for transfer-type, standard roll-in, and alternate roll-in showers.
Choosing a bar without identifying the shower type can lead to an unsuitable layout. The correct arrangement may also depend on whether the shower includes a seat.
Transfer-Type Shower Compartments
Under Section 608.3.1, transfer-type shower compartments require grab bars across the control wall and along the back wall to a point 18 inches from the control wall.
This arrangement is specific to the transfer-type compartment defined in the standard. It should not be copied automatically into every walk-in shower.
Check the official dimensions and the relationship between the bar, shower seat, controls, and entry area before finalizing the layout.
Standard Roll-In Showers
Section 608.3.2 addresses standard roll-in shower compartments.
Where a seat is provided, grab bars are required on the back wall and the side wall opposite the seat. The standard also states that grab bars must not be provided above the seat.
Where a seat is not provided, grab bars are required on three walls. The applicable provision also addresses the distance from adjacent walls.
These differences matter when planning a new shower or replacing existing hardware. A layout designed for a shower with a seat may not be suitable for one without a seat.
Alternate Roll-In Showers
Section 608.3.3 covers alternate roll-in shower compartments. It specifies grab bars on the back wall and the side wall farthest from the compartment entry.
The standard also includes requirements concerning the seat and the distance between bars and adjacent walls.
Because the arrangement differs from other shower types, confirm the compartment classification before using a diagram or ordering hardware.
Choosing and Installing ADA Compliant Shower Grab Bars
Choose products based on the required configuration, dimensions, and intended installation surface. Confirm that the bar will not obstruct controls, seats, or required clear floor space.
Wall construction matters, too. Tile, fiberglass, acrylic, and other shower surrounds may require different mounting approaches.
Do not assume that one type of anchor works for every wall. Follow the manufacturer’s instructions and seek qualified help when the supporting structure is uncertain.
For a product comparison, see our guide to shower handrails for the elderly.
A grab bar may not be the only bathing aid a person needs. See our guide on choosing a shower chair for elderly adults for help considering seating alongside grab-bar placement.
ADA Compliant Bathtub Grab Bars — Requirements and Placement
Bathtub grab-bar requirements differ according to whether the bathtub has a permanent seat or no permanent seat. Section 607.4 covers the relevant arrangements.
Before selecting products, identify the bathtub configuration and the locations of the control-end and head-end walls. These details affect the required placement and length.
Bathtubs With Permanent Seats
Section 607.4.1 addresses bathtubs with permanent seats.
It generally requires two grab bars on the back wall. One is positioned according to the applicable general provision, while the other must be between 8 and 10 inches above the bathtub rim. The standard also specifies the bars’ positions relative to the head-end and control-end walls.
A minimum 24-inch grab bar is required on the control-end wall at the front edge of the bathtub under Section 607.4.1.2.
These requirements form part of a specific configuration. Do not apply them automatically to a bathtub without a permanent seat.
Bathtubs Without Permanent Seats
Section 607.4.2 covers bathtubs without permanent seats.
It generally requires two back-wall grab bars, each at least 24 inches long. The standard specifies their position relative to the bathtub’s head-end and control-end walls.
A grab bar at least 24 inches long is also required on the control-end wall at the front edge of the bathtub. A separate grab bar at least 12 inches long is required on the head-end wall at the front edge.
The exact arrangement should be checked against the official provision and the actual bathtub layout.
How Bathtub Configuration Changes Grab-Bar Placement
The seat arrangement affects which provisions apply. The head-end and control-end walls also have different roles in the layout.
Measure the available wall space and identify the bathtub’s controls before choosing hardware. Confirm the required length, position, clearance, and mounting method for each bar.
If the bathtub is part of a private home, use these standards as a reference where appropriate. Local requirements, the renovation scope, and the user’s needs may also affect the recommended design.
How to Choose a Grab Bar That Meets the Applicable Requirements
Choosing the right grab bar requires more than matching the bathroom’s appearance. Consider the dimensions, installation method, intended use, and supporting structure together.
Use this checklist before purchasing:
- Diameter and cross-section: Confirm the actual product dimensions against the applicable requirements.
- Length and configuration: Match the bar to the intended toilet, shower, or bathtub location.
- Material: Choose a product suitable for a wet bathroom environment and follow its care instructions.
- Gripping surface: Look for a comfortable grip without sharp or abrasive features.
- Mounting method: Confirm that the mounting system is appropriate for the wall construction.
- Manufacturer documentation: Review installation instructions, specifications, and stated limitations.
- Available space: Ensure that the proposed location preserves required clearances and does not obstruct fixtures.
- User needs: Consider the person’s reach, balance, hand strength, and typical movements.
A high advertised weight capacity does not prove that a product and its installation satisfy all applicable requirements. Check the full documentation rather than relying on one number.
For a wider bathroom safety plan, our bathroom fall prevention guide for seniors covers additional hazards that grab bars alone cannot address.
Grab Bar Installation Requirements — Wall Support and Mounting
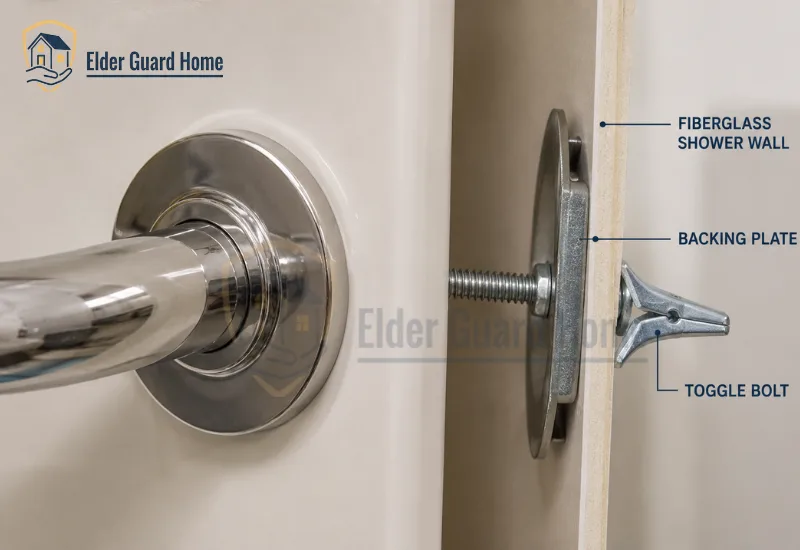
The mounting method is an important part of a safe installation. A bar that meets the dimensional requirements may still be unsuitable if the wall or mounting system cannot support it.
Why Wall Construction Matters
Bathrooms may contain drywall, tile, fiberglass, acrylic, masonry, or other wall assemblies. Each construction type presents different mounting considerations.
The correct approach depends on the actual structure, the product’s approved mounting method, and the installation instructions. Do not assume that every wall can support the same anchors.
Fiberglass and tile walls can require different installation approaches. For surface-specific guidance, read our guides on installing grab bars in a fiberglass shower and installing shower grab bars on tile without studs.
Studs, Backing, and Approved Mounting Systems
Some installations require mounting into structural framing or suitable reinforcement. Other products may specify a different approved system for particular wall assemblies.
Follow the product instructions and applicable building requirements. Do not rely on drywall alone unless the specific system is designed and approved for that use.
For fiberglass or acrylic surrounds, confirm that the method accounts for the wall material and its support. Incorrect drilling or mounting can damage the surround and compromise the installation.
When to Hire a Qualified Installer
Consider professional installation when you cannot identify the wall construction, when the required mounting points do not align with structural support, or when the project involves a regulated accessible facility.
A qualified installer can assess the mounting conditions and help determine whether the proposed arrangement is appropriate.
Do not test a newly installed bar by applying a 250-pound force. That figure belongs to the structural-strength requirement in the standard, not a DIY verification procedure.
How to Check a Grab Bar Installation Before Use
A preliminary visual inspection can help identify obvious problems. However, it cannot certify legal compliance or prove the installation’s structural strength.
Use this checklist before relying on a newly installed grab bar:
- Confirm the location. Check that the bar is intended for the fixture and configuration.
- Review the instructions. Make sure the installation follows the manufacturer’s requirements.
- Inspect the fittings. Look for visible damage, loose hardware, or gaps.
- Check the gripping surface. Look for sharp edges, abrasive areas, or damage.
- Check nearby obstructions. Ensure that shelves and fittings do not interfere with the intended grip.
- Confirm wall suitability. Make sure the mounting method is appropriate for the actual wall assembly.
- Seek professional advice when uncertain. Do not rely on a visual check if structural support is unclear.
Do not use the bar if it appears loose, damaged, or improperly mounted. Arrange for a qualified person to assess the problem before it is relied upon for support.
Common ADA Grab Bar Compliance and Safety Mistakes
Several common mistakes can undermine an otherwise good bathroom safety plan.
Using the Wrong Diameter
Circular bars under the 2010 ADA Standards generally fall within the 1¼-to-2-inch outside-diameter range. Using the older 1¼-to-1½-inch range as the only acceptable range incorrectly excludes some compliant sizes.
Check the applicable standard and the actual product dimensions.
Ignoring Wall Clearance
A bar may have the correct diameter but insufficient space between its gripping surface and the wall. Nearby projections can also affect clearance.
Check the finished installation, including nearby fittings.
Choosing a Bar That Is Too Short
Toilet, shower, and bathtub provisions have different requirements. A length suitable for one location may not meet the requirements for another.
Identify the fixture configuration before buying.
Assuming a Product Label Proves Compliance
A marketing phrase alone does not demonstrate that every relevant specification has been met. The installed arrangement also matters.
Review the product documentation and the applicable requirements.
Using an Unsuitable Mounting Method
An inappropriate mounting system can compromise the installation even when the bar itself has suitable dimensions.
Confirm the wall construction and follow the manufacturer’s instructions.
Treating Suction Bars as Permanent Weight-Bearing Support
Suction grab bars may offer temporary assistance in some circumstances, but they should not automatically replace properly installed permanent grab bars for substantial weight-bearing support.
ADA-Compliant Grab Bars vs. ADA-Style Grab Bars
The terms used in product listings can be confusing. A bar described as “ADA-style” may resemble an accessible grab bar without necessarily meeting every relevant requirement.
Likewise, a product marketed as “ADA compliant” does not automatically establish that the completed installation meets the applicable standard.
Before purchasing, check the actual dimensions, mounting instructions, and technical documentation. Then confirm that the bar’s intended location and installation arrangement match the applicable provisions.
For regulated facilities, compliance must be assessed against the requirements that apply to the project. For private homes, the same technical details can inform a safer installation, even where the ADA does not directly require every provision.
For renters or people who need temporary light balance support, our guide to suction grab rails for elderly users explains their surface limitations and why they should not replace permanent support when substantial weight-bearing assistance is needed.
Frequently Asked Questions
What makes grab bars ADA compliant?
The applicable requirements cover dimensions, wall clearance, positioning, surface hazards, fittings, installation, and structural strength. Toilet, shower, and bathtub locations have additional fixture-specific provisions.
The product and its installation must both be suitable for the applicable requirements. A product label alone is not enough to establish that the completed installation complies.
What diameter should ADA compliant grab bars have?
Circular grab bars generally must measure 1¼ to 2 inches in outside diameter under Section 609.2.1 of the 2010 ADA Standards. Non-circular bars have separate cross-section and perimeter requirements.
Always confirm the actual product dimensions.
Are ADA compliant bathroom grab bars required in every private home?
Not automatically. ADA applicability depends on the building, facility, and relevant legal provisions. Some residential settings and projects may have other accessibility obligations.
Homeowners can still use ADA requirements as a reference when planning safer bathrooms. Check applicable local requirements and seek professional advice when the project’s legal obligations are unclear.
Where should ADA compliant shower grab bars be installed?
The required arrangement depends on the shower configuration. Section 608.3 covers transfer-type, standard roll-in, and alternate roll-in shower compartments.
The presence of a seat can also change the required layout. Check the applicable provision rather than using one diagram for every shower.
What are the requirements for ADA compliant toilet grab bars?
Section 604.5 generally requires grab bars on the side wall closest to the toilet and on the rear wall, subject to the standard’s exceptions.
The side-wall and rear-wall bars have different minimum lengths and positioning requirements. Confirm the toilet configuration and the relevant measurements before selecting products.
What should I know about ADA compliant grab bars for toilet areas?
The side-wall and rear-wall requirements are not interchangeable. Section 604.5.1 generally specifies a side-wall bar at least 42 inches long, while Section 604.5.2 generally specifies a rear-wall bar at least 36 inches long.
The standard includes exceptions for certain wall-space and flush-control conflicts. Check the official provisions for the specific installation.
What are the requirements for ADA compliant bathtub grab bars?
Section 607.4 distinguishes bathtubs with permanent seats from those without permanent seats. The required bar locations and lengths differ between these configurations.
Identify the bathtub type and check the applicable provision before choosing hardware.
Does an ADA-compliant grab bar need to support 250 pounds?
Section 609.8 specifies a structural-strength requirement involving a 250-pound force applied at any point on the bar, fasteners, mounting devices, or supporting structure.
This is not the same as a product’s advertised weight rating. It is also not an instruction for homeowners to perform a 250-pound load test.
Can I install a grab bar on a fiberglass shower wall?
The correct method depends on the wall assembly, the product’s mounting instructions, and the available structural support. Not every anchor works for every fiberglass or acrylic surround.
If the mounting conditions are uncertain, consult a qualified installer before drilling or relying on the bar.
Are suction grab bars ADA compliant?
Do not assume that a suction-mounted bar is an appropriate substitute for a permanently installed grab bar. Suitability depends on the product, intended use, mounting conditions, and applicable requirements.
For users who need substantial weight-bearing support, seek advice on a suitable permanent installation.
Conclusion — Choose the Right Grab Bars and Verify the Installation
ADA compliant grab bars can help make accessible bathrooms safer when the correct products are installed in the required locations.
The most important details include diameter, wall clearance, surface safety, fittings, placement, and structural strength. Toilet, shower, and bathtub requirements differ, so one layout cannot be applied to every fixture.
For homeowners, a safer bathroom also depends on the person’s needs and the condition of the existing space. Product labels and visual inspections alone cannot establish that an installation meets every applicable requirement.
Grab bars are one part of a safer home. For more room-by-room precautions, read our guide on how to keep elderly parents safe at home.
Review the official standards, follow manufacturer instructions, and seek qualified help when wall support or compliance is uncertain.
For more practical steps, continue with our bathroom fall prevention guide for seniors. Combining suitable grab bars with other thoughtful bathroom improvements can support safer daily routines and greater independence.