
Who This Guide Is For
This guide is written for:
- Adult children installing grab bars for an aging parent
- Caregivers with little or no drilling experience
- Renters who need a stud-free installation method
- Homeowners with ceramic, porcelain, or glass tile walls
- Anyone whose previous grab bar install failed or wobbled
- Families who want to skip the contractor and do it safely themselves
Knowing how to install shower grab bars on tile without studs is one of the most valuable skills a family caregiver can have. Most bathroom walls are covered in tile, and studs rarely line up with safe grab bar placement. After 9 years and over 150 in-home safety assessments, I have seen this problem in nearly every bathroom I visit.
The good news is that stud-free installation works. You just need the right anchor method, the right drill bit, and a proper test before anyone puts weight on the bar. This guide covers all three anchor methods honestly to install grab bar on tile shower wall, walks you through all 10 installation steps, and shows you the 7 mistakes that crack tile every single time.
If you are also looking at bathroom fall prevention beyond grab bars, that guide covers the full picture for seniors aging in place.
Why Studs Are Hard to Find in Shower Walls
Most shower walls are built with tile over cement board or drywall. Studs sit behind that — typically 16 inches apart. The problem is that ADA-recommended grab bar heights rarely line up with stud locations. You need the bar at the right height for your parent’s safety. You cannot move the bar six inches to chase a stud.
This is exactly why anchor-based installation exists. Properly installed anchors in tile hold 250 pounds or more. That meets ADA standards and far exceeds real-world load. The key word is “properly.” Rushed installs with the wrong anchor or wrong drill bit fail. This guide makes sure yours does not.
For reference on ADA standards, see ada.gov.
3 Anchor Methods to install shower grab bars on tile walls without studs
Not all anchor methods are equal. Here is an honest comparison before we get into the steps.
| Method | Weight Capacity | Best For | Tile Crack Risk | Reversible |
|---|---|---|---|---|
| Toggle Bolts | Up to 300 lbs | Ceramic and porcelain tile over drywall | Low if drilled correctly | Yes |
| Epoxy Anchors | Up to 400 lbs | Porcelain tile over cement board | Very low | No |
| Adhesive Grab Bars | 50–75 lbs | Temporary use only — NOT for full weight bearing | None | Yes |
- Toggle bolts expand behind the wall when tightened. They hold well in drywall cavities and are the most common method for ceramic tile. They are reversible if you ever need to move the bar.
- Epoxy anchors fill the drilled hole completely and bond to the tile and backing material. They create the strongest hold of any stud-free method. The tradeoff is that the install is permanent.
- Adhesive grab bars are not a real safety solution for most seniors. A 75-pound limit sounds reasonable until your parent grabs the bar during a fall. I recommend them only for very light balance support in low-risk situations.
My recommendation for most families: use epoxy anchors for porcelain tile over cement board, and toggle bolts for ceramic tile over drywall. Adhesive bars are a last resort.
Tile Type Drilling Guide to install shower grab bars on tile without studs
The biggest cause of cracked tile is using the wrong drill bit at the wrong speed. Here is exactly what you need for each tile type.
| Tile Type | Drill Bit | Speed Setting | Crack Risk |
|---|---|---|---|
| Ceramic | Carbide-tipped masonry bit | Low (under 600 RPM) | Low |
| Porcelain | Diamond-tipped drill bit | Very low (under 400 RPM) | Medium without masking tape |
| Glass tile | Diamond-tipped glass bit | Very low with water cooling | High — consider professional install |
| Natural stone (marble/granite) | Diamond core bit | Low with water cooling | Medium — go slow |
Ceramic tile is the most forgiving. Porcelain is dense and hard — a carbide bit will skate across the surface and crack the glaze. Always use a diamond-tipped bit for porcelain. Glass tile is the highest risk, and I recommend calling a professional unless you have glass drilling experience. Natural stone needs water cooling to prevent heat cracks.
ADA Grab Bar Placement Heights
Correct placement protects your parent. The wrong height is almost as dangerous as no bar at all.
| Bar Type | Height From Floor | Location |
|---|---|---|
| Horizontal bar | 33–36 inches | Along shower wall beside seat or standing area |
| Angled bar (45°) | Lower end at 28 inches, upper end at 38 inches | Beside shower entry or seat |
| Vertical bar | Bottom at 38 inches, top at 54 inches | Near shower door or entry point |
ADA standards come from ada.gov and represent the minimum safe range for most adults. For seniors who are shorter or use a shower chair, placement should lean toward the lower end of each range. Mark your placement with masking tape before drilling so you can step back and check the height before making any holes.
If your parent also uses a shower chair, see our how to choose a shower chair for elderly guide for how grab bar and chair placement work together. Also check our guide on ADA Grab Bar Placement Heights.
Tools and Materials You Need to Install grab bars on tile wall
Before you start, gather everything in one place. You will need a power drill, the correct drill bit for your tile type, a level, a pencil or tile marker, masking tape, your chosen anchors (toggle bolts or epoxy), the grab bar itself, a wrench or socket set, safety glasses, and a clean rag.
Skipping the masking tape is the single most common reason DIY installs crack tile — the tape stops the drill bit from skating across the tile surface at the start of each hole.
For epoxy installs, you also need the two-part epoxy cartridge, the mixing nozzle, and a cartridge gun. Give yourself a full afternoon so you are not rushing the cure time.
10 steps to install shower grab bars on tile without studs
Steps 1–5: Prep and Drilling
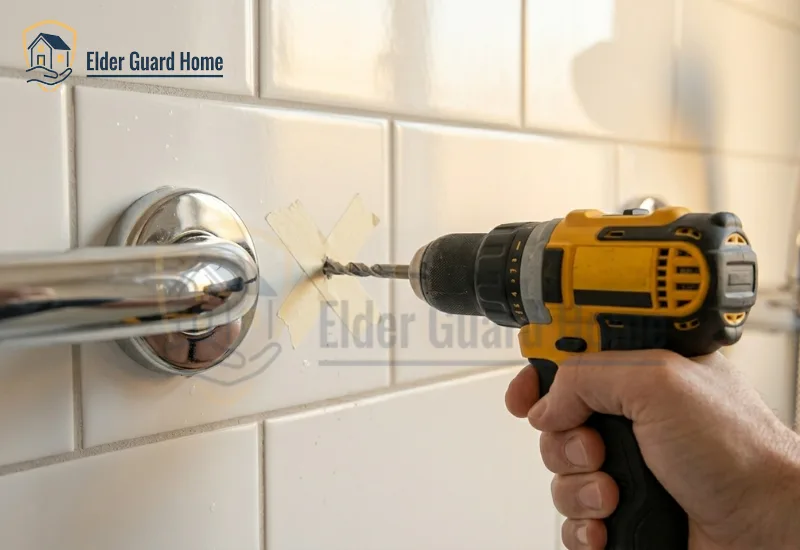
- Mark Your Placement: Hold the grab bar at ADA height and mark each mounting hole with a pencil. Apply a small X of masking tape over each mark. The tape gives the drill bit a surface to grip at startup.
- Choose the Right Drill Bit: Match your bit to your tile type using the table above. A wrong bit will crack your tile before the hole is half drilled. This step cannot be skipped or guessed.
- Set Your Drill to Low Speed: Ceramic tile needs under 600 RPM. Porcelain needs under 400 RPM. Set your drill to its lowest speed setting and turn off the hammer function completely. The hammer function destroys tile.
- Drill Your Pilot Holes: Start the drill at a slight angle to let the bit grip, then straighten it out once the bit has caught. Apply steady, light pressure — do not force the drill. Let the bit do the work. Stop every 10 seconds to let the tile cool.
- Clear the Holes: Use a dry rag to wipe dust from each hole. For epoxy installs, blow out loose debris with a can of compressed air. A clean hole lets the anchor bond properly. Check that each hole is the correct diameter for your anchor size.
Steps 6–10: Anchoring and Installing
- Insert Your Anchors: For toggle bolts, fold the wings flat and push them through the hole until they spring open behind the wall. For epoxy, inject into each hole until it is three-quarters full using the cartridge gun.
- Allow Cure Time (Epoxy Only): Most two-part epoxy needs 24 hours at room temperature to reach full strength. Check your product label. Installing before full cure is one of the most common reasons anchors fail.
- Align the Grab Bar: Hold the bar over the holes and confirm it is level before touching any bolts. An off-level bar puts uneven stress on anchors over time. Use your level one final time before tightening.
- Tighten the Bolts: Alternate between holes rather than fully tightening one side first. Stop when the bar mount sits flush with no gap. Do not overtighten — overtightening cracks tile from the inside.
- Post-Install Safety Test: Apply 250 pounds of downward and outward force against the bar. It must not move, wobble, or produce any cracking sounds. Check each mounting point for grout line stress. If anything moves, remove the bar and reinstall with epoxy. Only let your parent use the bar after it passes this test.
Pair your new grab bar with non-slip bath mats for elderly for full floor protection. Our best shower bench for elderly guide covers seating options that work alongside grab bars.
7 Tile-Cracking Mistakes to Avoid
Knowing how to install shower grab bars on tile without studs means knowing what destroys tile before the bar is ever loaded.
- Wrong drill bit: Using a masonry bit on porcelain cracks the surface before the hole starts. Match bit to tile type every time.
- Drilling too fast: High speed creates heat, and heat cracks tile from the inside. Use the lowest speed setting on your drill.
- Skipping masking tape: Without tape, the bit skates across the glaze and starts a crack that spreads under load.
- Drilling on grout lines: Grout is far weaker than tile and gives anchors almost nothing to grip. Drill in the center of the tile face only.
- Overtightening bolts: Snug and flush is the goal. Overtightening creates hairline cracks that spread over time and weaken the entire mount.
- Using adhesive bars for full weight support: A 75-pound limit sounds reasonable until your parent catches themselves during a fall. That load can exceed 200 pounds. Adhesive bars will pull off the wall at exactly the wrong moment.
- Skipping the post-install load test: A bar that looks solid can still fail under weight. The load test is the only way to know your install is safe before your parent uses it.
Pair your grab bar with a best non slip shower chair for elderly — the two together cut bathroom fall risk far more than either one alone.
When to Call a Professional Instead
Some tile situations are genuinely beyond a safe DIY install. Glass tile walls carry a very high crack risk and need water cooling and specialized bits that most homeowners do not own.
If the tile is already cracking, chipped, or loose at the edges, any drilling will make it worse. Tap the wall before drilling — if it sounds hollow everywhere, the backing material may be compromised and cannot hold anchors safely.
Renters with strict lease terms should check with their landlord before drilling anything. Some leases require professional installation for any wall penetration.
For those situations, a tension-pole grab bar system can provide some support without any drilling at all — though load limits are lower than a properly anchored bar.
For most ceramic and porcelain tile walls in good condition, this install is safely within DIY range. You just need the right tools and patience.
For renters who cannot drill at all, removable grab rails work on smooth glazed ceramic tile surfaces. Our guide explains exactly which tile surfaces hold suction safely, the honest weight limits, and how to test your wall before trusting it with your parent’s weight.
Frequently Asked Questions
Can you install grab bars on tile without drilling?
Adhesive grab bars exist and require no drilling, but they hold only 50–75 pounds. That is not enough for a senior who grabs the bar during a fall. For real safety, drilling with the right anchors is the correct approach.
How much weight can a grab bar hold without studs?
Toggle bolts in ceramic tile hold up to 300 pounds. Epoxy anchors in porcelain hold up to 400 pounds. Both exceed ADA requirements when installed correctly. The post-install load test confirms your specific install is safe.
What drill bit do I use for porcelain tile?
Use a diamond-tipped drill bit set to under 400 RPM with the hammer function turned off. A standard carbide masonry bit will skate across the porcelain glaze and crack the tile before the hole is started.
How do I know if my grab bar is installed safely?
Run the Step 10 post-install load test. Apply 250 pounds of force in a downward and outward direction. The bar must not move or produce any cracking sounds. Check each mounting point visually for grout stress after the test.
Do grab bars need to hit studs to be safe?
No. Properly installed epoxy anchors or toggle bolts in tile hold more weight than most stud-mounted installs. The key is using the right anchor for your tile type and running a proper load test.
Conclusion
Installing shower grab bars on tile without studs is completely achievable with the right preparation.
After 9 years visiting homes as a Certified Senior Home Safety Specialist, I can tell you that the families who take one afternoon to do this correctly give their parent something that prevents falls for years.
The 10-step process in this guide has been tested in real homes. Follow every step, do not skip the load test, and your parent will have a bar they can trust.
Download your free 9-point Senior Safety Checklist to make sure the rest of the bathroom is just as safe. And if you want the full picture of bathroom fall risk, our bathroom fall prevention guide covers every layer — from floor to walls to lighting.