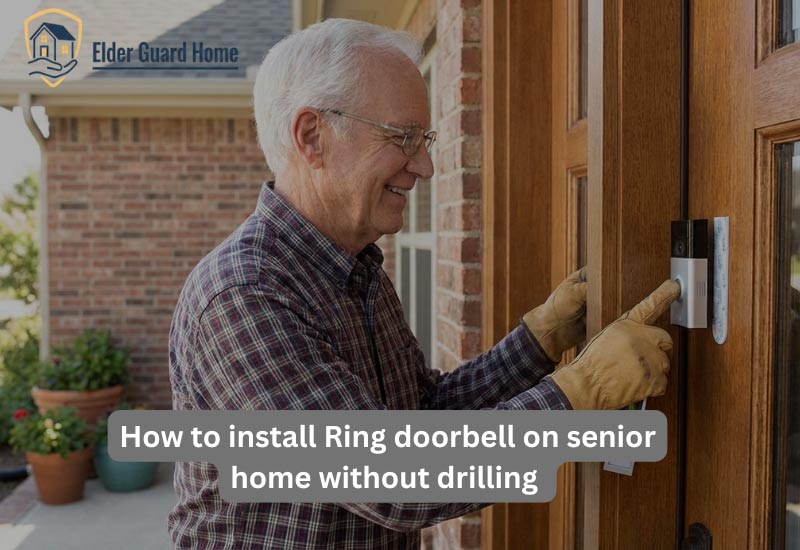
Managing senior home safety is a top priority for those living independently. Consequently, you may want to learn how to install Ring doorbell on senior home without drilling to keep things simple.
Specifically, the Ring doorbell is a fantastic tool for monitoring visitors and preventing doorstep scams. However, drilling into brick or siding can be a major hurdle for older homeowners. Furthermore, many seniors live in rental properties with strict rules.
This guide provides the best ways to install a Ring doorbell without using power tools. We focus on simple, secure, and reliable methods that anyone can follow.
Instead of making permanent changes, you can use modern adhesives and specialized clamps. These tools offer the same protection as traditional screws without any of the mess.
How to Install Ring Doorbell on Senior Home Without Drilling
Staying safe at home starts with a clear view of your front door. Specifically, a video doorbell lets you see and speak to visitors safely. This prevents you from opening the door to strangers or potential fraudsters. Additionally, it helps you keep track of packages and deliveries throughout the day. By following this guide, you can enjoy these benefits with zero drilling required.
Why No-Drill Installation is Best for Senior Home Safety
Many seniors prefer a tool-free setup for several practical reasons. Specifically, using a heavy power drill can be physically demanding or dangerous. Furthermore, drilling into home exteriors can lead to long-term issues like water leaks. Consequently, a no-drill method is the smartest choice for home security for seniors.
Physical Ease: No need to hold heavy tools or climb tall ladders.
Rental Friendly: Perfect for those who do not own their home.
Property Value: Keeps your siding, brick, and door frames in perfect condition.
Simple Maintenance: Easier to remove the device for charging or moving.
Top 3 Best No-Drill Mounts for Ring Doorbell in 2026
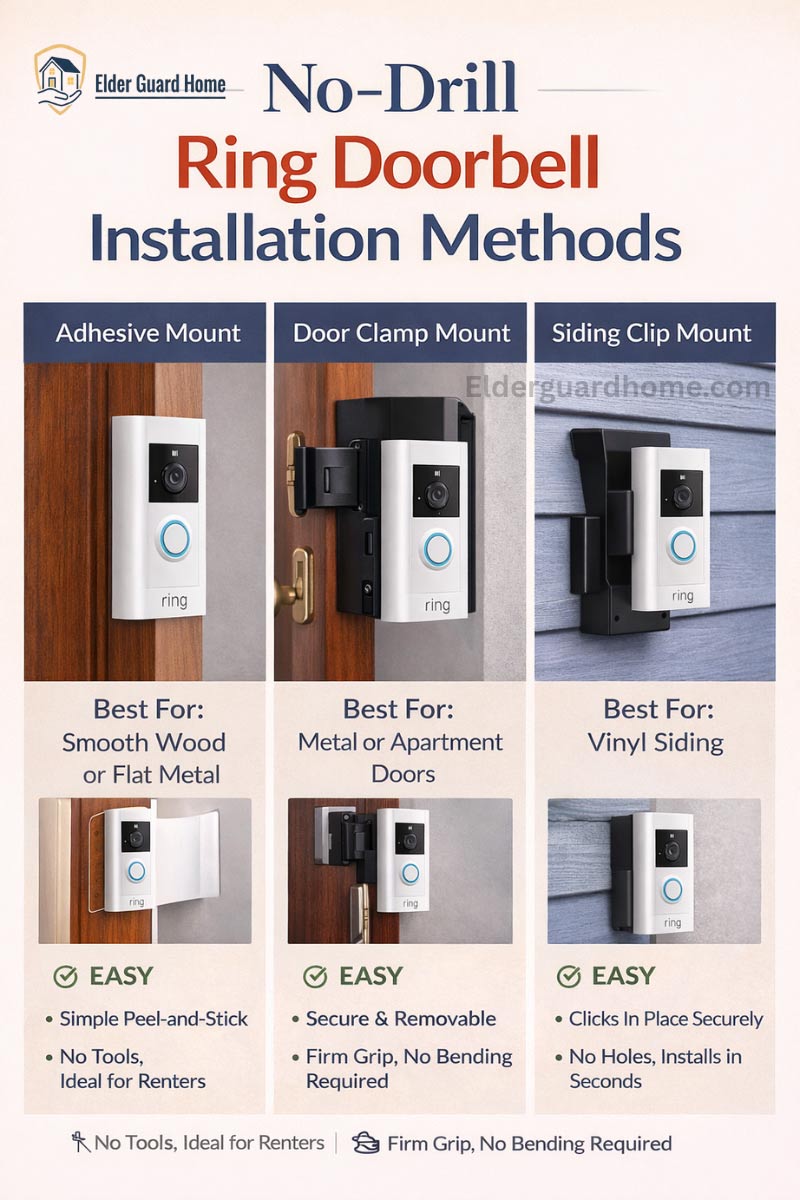
Choosing the right hardware is the most important step for success. Specifically, you must match the mount to your home’s exterior surface. Consequently, we have selected the three most reliable options for 2026. These products are known for their strength and ease of use.
1. The Official Ring No-Drill Mount (Best for Smooth Surfaces) - Buy Now for Easy No-Drill Setup
This mount uses industrial-strength adhesive to grip your wall. Specifically, it works best on smooth surfaces like painted wood or flat metal. Furthermore, it is designed by Ring to fit their battery-powered models perfectly. Consequently, you get a clean look without any extra gaps.
The Official Ring No-Drill Mount is a top choice for senior home safety on flat areas. Because it comes from the manufacturer, it fits your camera with total precision. Thus, you do not have to worry about loose parts or poor alignment. Moreover, the sleek design blends into your entryway without looking bulky or out of place.
When to Use This Mount
This option is best for smooth, painted surfaces like wood or vinyl frames. Since the adhesive needs a flat area, avoid using it on rough stone. In addition, it works perfectly for seniors who want a very fast setup. For this reason, you can make safe living for older adults in minutes.
Pros of the Official Mount
- Perfect Fit: Every button and sensor remains completely clear for the best video.
- Strong Bond: The weather-resistant tape handles rain and high winds without moving.
- Easy Setup: You simply peel the backing and stick it to the wall.
- Clean Look: It stays hidden behind the doorbell for a very professional appearance.
Cons of the Official Mount
- Permanent Tape: Removing the mount later requires a bit of heat and patience.
- Limited Surfaces: It will not stay attached to bare brick or dusty concrete.
- Single Use: Once you peel the tape, you usually need new strips to move it.
2. Anti-Theft Door Mount Brackets (Best for Apartment Dwellers) - Check Price on Amazon
These Anti-theft brackets wrap around the edge of your front door. Specifically, they use a clamping mechanism that you tighten from the inside. This means no adhesive and no screws are touching your actual door. Furthermore, it prevents anyone from stealing the camera while you are away.
When to Use This Mount
This style is ideal for inward-opening doors with a standard thickness. Since it does not use adhesive, it works well in very humid or salty air. In addition, choose this if you plan to move your camera frequently. Thus, you can take your security with you to any new location easily.
Pros of the Anti-Theft Clamp
- Maximum Security: The metal housing prevents anyone from physically grabbing your doorbell.
- No Residue: You never have to worry about cleaning up sticky tape later.
- Fast Removal: Simply unscrew the internal knob to take the unit down.
- Sturdy Grip: It remains stable even if the door is slammed shut often.
Cons of the Anti-Theft Clamp
- Door Gap Required: Your door must have a small gap to close over the bracket.
- Inward Only: It generally does not work on doors that swing toward the outside.
- Bulkier Profile: The metal frame is more visible than a simple adhesive strip.
3. Heavy-Duty Vinyl Siding Clips (Best for Traditional Homes) - Check Current Deal on Amazon
If your home has vinyl siding, these clips are a lifesaver. Specifically, they slide under the siding panels and lock into place securely. Consequently, they provide a rock-solid base for your doorbell without any tape or glue.
This method protects elderly households without risking damage to the siding. For this reason, many homeowners prefer this mechanical grip over standard adhesive strips.
When to Use This Mount
This choice is perfect for homes covered in horizontal vinyl or metal siding panels. Since the clips slide under the slats, they work best on overlapping surfaces. In addition, use these if you want to mount your camera away from the door. Thus, you can get a better angle of your entire front walkway or porch.
Pros of Vinyl Siding Clips
- No Surface Damage: You never have to worry about staining or peeling your siding.
- Heavy Duty: These stainless steel hooks can support several pounds with total ease.
- Adjustable Height: Simply slide the clips up or down to find the perfect view.
- Weather Proof: Metal clips do not dry out or crack in the hot sun.
Cons of Vinyl Siding Clips
- Specific Fit: These only work on siding with a curved or hooked bottom edge.
- Visible Gaps: The clips might create a very tiny space between your siding panels.
- Tool-Free but Fiddly: It takes a little practice to snap them into the right spot.
Comparison Table:
| Mount Type | Best Surface | Key Benefit | Main Drawback | Ease of Installation | Reusability | Best For | Price Range |
|---|---|---|---|---|---|---|---|
| Official Ring Adhesive | Smooth Wood or uPVC | Slim and sleek design | Hard to reuse tape | Very Easy (peel & stick) | Low (single-use) | Homeowners / Clean look | Low to Mid |
| Anti-Theft Door Clamp | Apartment/Metal Doors | Total theft protection | Visible metal frame | Easy (no tools) | High (removable) | Renters & Seniors | Mid |
| Vinyl Siding Clips | Horizontal Siding | No sticky residue left | Only fits specific slats | Easy (clip-on) | Very High | Vinyl siding homes | Low |
✔ **Ring Battery Doorbell** – easy setup, no wiring needed ✔ **No-Drill Doorbell Mount Kit** – secure no-drill mounting No tools, no drilling, no mess — perfect for aging in place
Step-by-Step: Installing Ring Doorbell for Elderly Parents Without a Drill
Installing a Ring doorbell without drilling should feel simple, not stressful. We’ve broken the process into three clear stages that work well for senior homes and rental properties. Before you begin, fully charge the Ring battery and choose a dry, mild-weather day for best adhesive strength.
Recommended No-Drill Mounts for Ring Doorbells:
These mounts work well for seniors and renters:
**Standard Adhesive No-Drill Mount** — Best Overall for Seniors
Check Price on Amazon
**Siding Clip Mount** — Perfect for vinyl siding
Buy on Amazon
**All-Surface Anti-Slip Mount** — More secure adhesion
Buy Now for Easy No-Drill Setup
Here’s how to install your Ring doorbell without drilling:
Step 1: Prepare the Surface for a Strong, Long-Lasting Hold
A secure installation always starts with proper surface preparation. Skipping this step is the most common reason adhesive mounts fail.
What to do:
Clean the mounting area with rubbing alcohol or a household glass cleaner
Remove all dust, grease, and moisture
Wipe until the surface feels completely dry and smooth
Wait at least 10 minutes before applying the mount
Helpful tip:
Avoid textured brick, loose paint, or peeling siding. Flat surfaces like vinyl siding, metal door frames, or smooth wood provide the best grip.
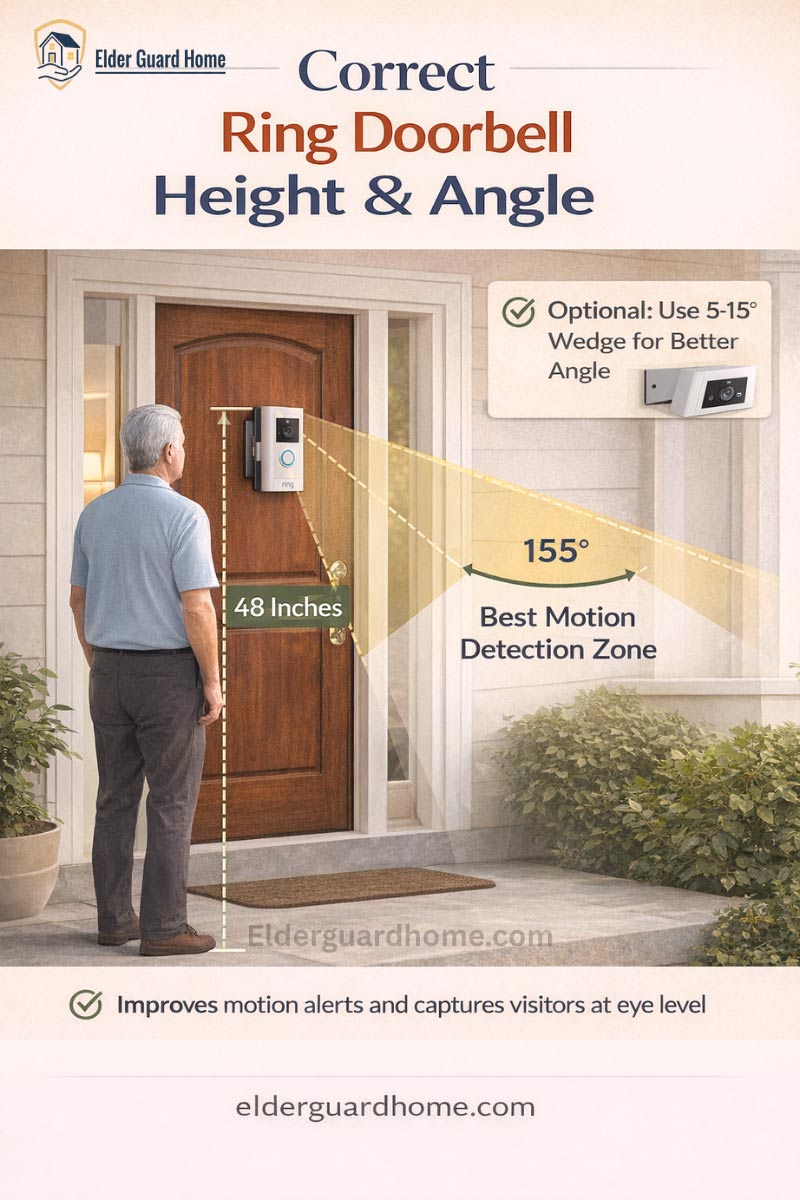
Step 2: Align the Doorbell Camera for Clear Visibility
Correct positioning ensures the camera captures faces, packages, and motion alerts accurately.
Before removing the adhesive backing:
Hold the mount in place without sticking it
Use the Ring app’s live view to test the camera angle
Check that faces and the ground near the door are visible
Position the camera at chest height, not too high
What to avoid:
Mounting too high (short visitors may not be detected)
Pointing directly into bright sunlight
Blocking the lens with door trim or decorations
Step 3: Secure the Doorbell and Activate Anti-Theft Protection
Once the mount is properly placed, it’s time to secure the device.
Follow these steps:
Press the mount firmly onto the surface for 30–60 seconds
Attach the Ring doorbell to the mount
Use the included security screwdriver to tighten the anti-theft screw
Gently test by pulling forward to confirm it’s locked in place
This small locking screw prevents the doorbell from being removed easily, adding peace of mind for seniors living alone.
Final Check: Test Before Walking Away
Before finishing, take one minute to confirm everything works correctly:
Open the Ring app and confirm live video loads
Walk past the door to test motion alerts
Press the doorbell to confirm audio and notifications
Adjust sensitivity settings if needed
Once tested, your Ring doorbell is ready to protect the home — no drilling required.
Doorbell cameras improve entry security. Still, indoor safety is just as important.
That’s why many families install fall detection system without wearable buttons to monitor seniors inside the home.
Why This Matters for Senior Homes
One issue families often overlook is that poor camera placement can make a doorbell useless during emergencies. Taking a few extra minutes to align and secure the device properly can prevent missed alerts and false notifications later.
Will the adhesive mount hold up in extreme heat or freezing rain?
Outdoor conditions can easily weaken low-quality sticky pads over a single season. Consequently, choosing a high-bond tape like 3M VHB is vital for long-term safety.
This specific industrial-strength tape is designed to withstand temperatures from -35°C to 90°C. Moreover, it resists moisture and UV rays that usually cause cheaper plastics to crack.
Beyond just the tape, you must ensure the mounting surface is completely dry during installation. Even a tiny bit of condensation can prevent a proper bond from forming. For added peace of mind, check the mount’s firmness during your seasonal home maintenance.
Common Ring Doorbell Installation Mistakes Seniors Should Avoid
Even with no-drill mounting options, a few small mistakes can reduce performance or cause the device to fall over time. Avoiding these issues helps ensure reliable alerts and long-term safety.
Mounting on Dirty or Damp Surfaces
Adhesive mounts fail most often because the surface was not fully cleaned or dried. Dust, moisture, or leftover cleaner residue can weaken the bond within days.
What to do instead:
Always clean the surface thoroughly and wait at least 10 minutes before attaching the mount.
Placing the Camera Too High or Too Low
Mounting the doorbell too high can miss faces, while placing it too low may limit motion detection or capture only the ground.
What to do instead:
Position the camera at chest level and confirm visibility using the Ring app before securing it.
Skipping the Security Screw
Some users skip the small anti-theft screw, assuming the adhesive alone is enough. This makes the doorbell easier to remove.
What to do instead:
Always use the included security screwdriver to lock the device in place.
Installing on Rough or Uneven Surfaces
Textured brick, peeling paint, or uneven siding can prevent adhesive mounts from holding securely.
What to do instead:
Choose smooth surfaces like metal door frames, vinyl siding, or flat wood trim.
Forgetting to Test Motion and Alerts
Installing the device without testing alerts can lead to missed notifications or false alarms.
What to do instead:
Walk past the door, press the doorbell, and confirm notifications work correctly in the app before finishing.
Helpful Doorbell Accessories for Seniors:
Keeping your Ring system ready and secure:
✔ **Extra Ring Battery Pack** — Extended uptime
Check Price on Amazon
✔ **Ring Security Screw Kit** — Easier anti-theft security
Buy Security Screw Kit on Amazon
✔ **Weather Shield for Doorbells** — Protection from elements
Buy on Amazon
Real Installation Experiences from Seniors and Renters
Many seniors and renters choose no-drill Ring doorbell mounts because traditional installation feels overwhelming or is not allowed by lease rules. In real homes, small details often decide whether the mount lasts months or falls within days.
Several renters report that letting adhesive mounts cure for a full 24 hours before attaching the Ring doorbell greatly improves long-term stability. Skipping this waiting period is one of the most common reasons adhesive mounts fail.
In one common scenario, a caregiver installed a Ring doorbell on a metal apartment door frame using a no-drill adhesive mount. Initially, the mount loosened after a few days. After cleaning the surface again and allowing the adhesive to cure overnight before attaching the device, the mount held firmly for months without issues.
These real-world situations show that installation technique matters just as much as the mount itself, especially for seniors living alone who depend on reliable alerts. These things are really important if you want to Install Ring Doorbell on Senior Home Without Drilling.
Can a senior with arthritis easily change the battery without removing the mount?
Many traditional mounts require a tiny, frustrating security screw located at the very bottom. Naturally, this can be a significant hurdle for anyone with limited hand dexterity.
To solve this, look for “quick-release” mounts that feature larger, textured grip points. These allow you to slide the camera out while the base stays fixed.
Another excellent option is a solar charger surround that keeps the battery full year-round. This eliminates the need to handle small parts or climb ladders entirely. By choosing the right hardware, you ensure that staying safe does not become a physical chore.
Practical Installation Specs You Should Know
While no-drill Ring doorbell mounts are designed for simplicity, understanding basic technical limits helps avoid installation mistakes.
Key technical considerations:
Most adhesive mounts are designed to support devices weighing under 1.5 pounds, which covers all current Ring battery doorbells.
Adhesive performance is strongest on smooth, non-porous surfaces such as metal, vinyl, sealed wood, or painted trim.
Recommended installation height is 48 to 52 inches from the ground, which helps capture faces clearly while maintaining reliable motion detection.
Cold weather can weaken adhesive bonds during installation. For best results, apply mounts when temperatures are above 50°F (10°C).
These guidelines ensure clear video coverage, reliable alerts, and long-term mounting stability.
What Ring Officially Recommends
According to Ring’s official installation guidance, battery-powered Ring doorbells are designed for flexible mounting and do not require drilling in many situations. Ring recommends placing the doorbell at a height that allows clear face visibility while ensuring motion sensors cover walking paths.
Ring also advises users to:
Fully charge the battery before installation
Test motion alerts before finalizing placement
Secure the device using the included security screw
Following manufacturer installation recommendations ensures compatibility, device safety, and accurate motion detection.
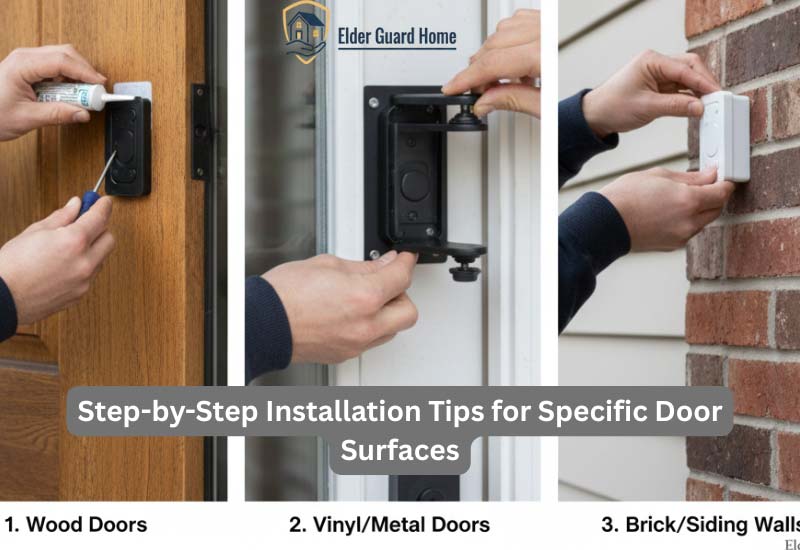
Step-by-Step Installation Tips for Specific Door Surfaces
Expanding your senior home safety setup means looking at your specific door type. Specifically, a brick wall requires a different plan than a metal door frame. Consequently, this section provides tailored advice for every home style. Furthermore, following these tips ensures your home security for seniors remains stable in all weather.
Each surface has its own set of rules for a drill-free setup. Specifically, you must use the right adhesive or clamp for your material. Consequently, your doorbell will stay secure without falling or being easily stolen.
1. Smooth Wood and uPVC Door Frames (The Easiest Type)
Most modern homes feature these flat surfaces at the entrance. Because these materials are non-porous, adhesive mounts work perfectly here.
Prep: First, use a damp cloth with alcohol to clean the frame.
Action: Next, press the mount against the wood for two full minutes.
Wait: Then, allow the bond to set for an hour before adding the camera.
Result: In the end, you get a clean look without any permanent holes.
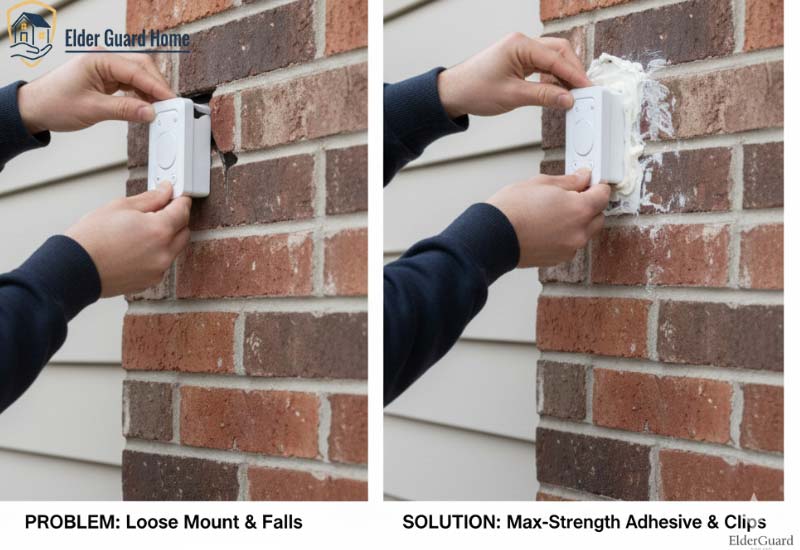
2. Rough Brick and Textured Stucco (The Hardest Type)
Standard adhesive tape often fails on bumpy or uneven walls. For example, the tape might only touch a few spots on the brick. As a result, the device could fall off during a storm.
Solution: Apply a thicker, industrial-strength mounting tape instead.
Alternative: You might also look for a specialized brick clamp.
Tip: Also, make sure the surface is not crumbling or dusty. Otherwise, the tape will not grab the wall correctly.
3. Metal and Steel Apartment Doors (The Renter's Choice)
Many landlords do not allow any stickers or tape on the door. Therefore, a metal bracket is the best tool for this situation.
Fit: Simply slide the bracket over the edge of the open door.
Tighten: Afterward, turn the inner knob to lock it into place.
Advantage: Furthermore, you can remove it in seconds when you move out. Since there is no glue, the door remains in perfect condition.
4. Glass Doors and Storm Doors (The Visual Type)
Avoid placing tape directly on the glass because it looks messy. Similarly, it can be harder to remove later without leaving marks.
Better Way: Stick the mount to the metal frame surrounding the glass.
Safety: If you must use glass, choose a clear mounting strip. Along with that, check your video for glare from the sun.
Pro-Tips for Long-Term Safety and Maintenance
Keeping your senior home safety gear working is a year-round job. For instance, cold weather can sometimes make plastic mounts brittle. Due to this, a quick check every season is a smart habit.
Battery Care: Always charge the unit to 100% before you mount it.
Weather Check: Also, inspect the adhesive after a very hot summer day.
Wi-Fi Strength: Check your signal before you finalize the mounting spot. Indeed, a small move can make the video much clearer.
By selecting the right method, your aging-in-place solutions will be reliable. Above all, you protect your peace of mind without damaging your property.
How to remove the adhesive without damaging your door if you move?
Removing a strong bond requires a gentle touch to avoid peeling off paint or wood stain. First, use a hair dryer on a medium setting to soften the glue.
Afterward, take a piece of dental floss or thin fishing line to “saw” through the foam. This method separates the mount from the door without any prying tools. If a sticky film remains, a simple citrus-based cleaner will dissolve the residue safely.
Following these steps ensures your security deposit stays safe if you live in a rental. It also keeps your home’s entrance looking clean and professional for the next resident.
How to Use Ring Doorbell Without a Smartphone for Seniors
Many guides on how to install Ring doorbell on senior home without drilling ignore tech skills. However, using a small smartphone screen can be difficult for some. Specifically, the icons are tiny and notifications can be easy to miss. Therefore, we recommend pairing your doorbell with an Amazon Echo Show.
Instead of searching for your phone, the Echo Show acts as a TV. Specifically, when someone rings the bell, the screen automatically shows the live video. Furthermore, you can use your voice to say, “Alexa, talk to the front door.”
This allows for hands-free security that is much easier on the eyes. Additionally, you can place multiple Echo devices around the house. Consequently, you will never miss a visitor even if you are in the kitchen.
If you want to monitor elderly parents without a smartphone, try these low-tech tools. These devices offer constant home safety without using complex mobile apps.
Common Problems with No-Drill Setups (And How to Fix Them)
Sometimes, even a perfect no-drill setup needs a little extra attention. For this reason, I have listed the most frequent issues below. In addition to these fixes, always check your Ring app for updates.
1. The Doorbell Feels Loose
If your camera wiggles, the adhesive might not have bonded fully. For instance, cold weather often slows down the drying process.
- The Fix: First, remove the mount and clean the surface again.
- Next Step: Then, apply fresh tape and hold it for three minutes.
- Result: Eventually, the bond will become strong enough to hold the weight.
2. Poor Video Quality or Lag
A metal door can sometimes block your Wi-Fi signal. As a result, your video might look blurry or take time to load.
- Solution: Move your router closer to the front door if possible.
- Alternative: Similarly, you can plug in a Chime Pro to extend the signal.
- Benefit: Thus, you will see visitors in clear detail every time.
3. High Battery Drain
In the beginning, your camera might record too much activity. Because of this, the battery could die in just a few weeks.
- Adjustment: Simply lower the “Motion Sensitivity” settings in the app.
- Advice: Also, set “Motion Zones” to ignore the street or sidewalk.
- Outcome: Afterward, your battery will last much longer between charges.
4. Adhesive Leaving Residue
You might worry about ruining the paint when you remove the mount. However, there is a safe way to pull it off.
- Tip: Use a hair dryer to warm the tape for sixty seconds.
- Action: Afterward, slowly peel the mount away from the frame.
- Cleanup: Finally, use soapy water to wipe away any leftover stickiness.
Pro-Active Safety Habits
Reliable senior home safety requires more than just a good installation. Along with tech fixes, you should test the doorbell button once a week. Indeed, this ensures the chime is loud enough for you to hear. Moreover, keep the lens clean with a soft microfiber cloth. Since dust can block the sensors, a quick wipe makes a huge difference.
Actually, your home security setup becomes even stronger with extra cameras. Consequently, you should learn about setting up Wyze cameras for elderly parents without a smartphone to ensure total safety.
Frequently Asked Questions
Will the adhesive damage my door paint?
Generally, high-quality adhesive is safe for most modern painted surfaces. However, you should use a hair dryer to warm the tape before removal. Thus, the glue softens and peels away without pulling off the paint.
Can someone just steal the doorbell if it is not screwed in?
Many no-drill mounts feature an anti-theft inner cage made of strong metal. Moreover, the camera is locked inside the bracket once you close the door. Consequently, a thief cannot remove the device without opening your front door first.
Does the no-drill mount work with all Ring models?
Most mounts are designed specifically for the Battery Doorbell and Video Doorbell Plus. In addition, always check the box for your specific model number before buying. For this reason, you will ensure a perfect and secure fit.
How long does the mounting tape actually last?
Industrial-strength tape can last for several years in most normal weather conditions. Nevertheless, extreme heat or heavy ice might eventually weaken the chemical bond. As a result, we suggest a quick physical check every few months.
Is the signal weaker because of the metal mount?
Most brackets are open at the back to allow for better signal flow. Similarly, you should place the device away from thick steel frames if possible. Afterward, check the app to ensure your connection remains in the green zone.
Final Thoughts on Senior Home Security Without Tools
Learning how to install Ring doorbell on senior home without drilling is a smart move today. Because you avoid permanent damage, your home remains in great condition. Moreover, these simple tools help you manage your own Smart home automation. For this reason, anyone can handle this task with total confidence.
In addition to saving time, no-drill mounts offer great flexibility for renters. Since no holes are made, you never have to worry about costly repairs. Furthermore, you can move the camera easily if your needs change later. Consequently, you get professional results without the high cost of a handyman.
Above all, mastering how to install Ring doorbell on senior home without drilling creates safety. Thus, taking this small step today creates a much safer living environment. In summary, modern technology makes protecting your entryway easier than ever before. Please share this guide to help others achieve the same security and independence.
Secure your Ring Doorbell and mounts here: 👉 **Buy Ring Doorbell on Amazon** 👉 **Get a no-drill mount kit now**
These are trusted security tools we personally recommend for seniors and caregivers.